README-en.md 14KB
Sorting Algorithms - Pesky Tourist
[Verano 2016 - Ive]
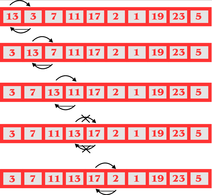
Two common tasks when working with arrays of data is to search for and sort the data in ascending or descending order. Two well known simple sorting algorithms are Selection Sort and Bubble Sort. Sorting algorithms make up part of many programs; for example, contact lists, search engines, etc. In this laboratory experience you will complete an application to process images and pratice the use of sorting algorithms. You will also learn about the QImage library from Qt and about the median filter used in image processing to remove noise, in this case a pesky tourist.
Objectives
Practice sorting arrays by selection and the bubble method.
Practice the use of decision and repetition structures.
Use methods from the
vectorC++ class.Use the methods of the
QImageclass fromQtto manipulate an image’s pixels.Learn about the median filter for image processing.
This laboratory experience is an adaptation of the nifty assignment presented by John Nicholson in [1].
Pre-Lab:
Before arriving at the laboratory you should have:
Reviewed the selection sort and bubble sort algorithms.
Familiarized yourself with the
push_back(),at(i),size(),clear()methods in the C++vectorclass.Familiariezed yourself with the
width(),height(),pixel(i, j),setPixel(i,j, pixel)methods in theQImageclass fromQt.Studied the concepts and instructions for the laboratory session.
Taken the Pre-Lab quiz, available in Moodle.
Pixels:
The smallest element in an image is called a pixel. This unit consists of a single color. Since each color is a combination of tones of the primary red, green and blue colors, it is coded as an unsigned integer whose bytes represent the tones of red, green and blue of the pixel (Figure 1). One fourth of a byte specifies what is known as the alpha composition, which defines the opacity of the pixel (0xff is completely opaque and 0x00 is completely transparent, i.e. invisible). This combination is known as the ARGB of the color for “Alpha-Red-Green-Blue”. For example a pixel of pure red has an RGB representation of 0xffff0000, while a pixel of pure white has an RGB representation of 0xffffffff (since the color white is the combination of the red, green and blue tones in their maximum intensity). Throughout this lab we will assume the pixel’s alpha has total opacity (0xff).
Figure 1. Distribution of bits for the alpha composition and the red, green and blue tones within the ARGB representation. Each tone can have a value between 0x00 (all eight bits on 0), and 0xFF (all eight bits on 1).
In Qt, a QRgb type is used to represent ARGB values. Using certain functions that will be described below we can obtain the red, green and blue components of the QRgb value of a pixel and manipulate the images. In this lab we will not manipulate the alpha channel of the pixels.
Today’s laboratory experience will use the QImage class. This class permits access to the data of the pixels of an image to manipulate it. The documentation for the QImage class can be found in http://doc.qt.io/qt-4.8/qimage.html.
Image Processing
Image processing is used in a wide variety of socially relevant applications. People daily apply image processing filters to their pictures before posting them in a social media. Social media, cameras, and mobile devices use image processing for face recognition. Researchers use image processing to count organisms inside a scanned space, to detect anomalies inside computer tomography (CT) scans, and in general to reveal information about scanned objects.
The median filter is one of the simplest filters used in image processing. It is very useful for removing undesired objects from images. Let’s say that you encounter the most interesting tree in the world and you would like to photograph it. You set up your photography equipment, the light is perfect, the colors are beautiful. To be sure that you capture the perfect photo you take three of them. However, at the exact moment that the photos were taken a pesky tourist photobombed your master creation. The median filter will help you remove the tourist from the photo by merging the three photos into a tourist-free nature shot.
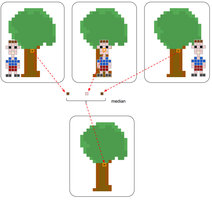
Given three or more images of the same space, a median filter works as follows: for each pixel position $$(x,y)$$ find the median color among the images, then use the median color in the merged image.
Figure 2. Illustration of the median filter algorithm for a given pixel. The pixel’s colors are determined in the three images, then the median is calculated. The median of the pixel is used in the corresponding position of the merged image.
Median
The median of a list of numbers is the value that separates halve the numbers with a higher value from the half of the numbers with a lower value. To calculate it, the list is ordered in ascending order. If the number of elements is odd, the middle value is chosen. If the number of elements is even, the average of the two middle values is taken.
For example, the median of {3,5,2,7,11} is 5 since the ordered array is {2, 3, 5, 7, 11}. The median of {3,9,3,2,10,11} is 6 since the ordered array is {2, 3, 3, 9, 10, 11} and the average of 3 and 9 is 6.
Median of pixels
The method we will be using in this laboratory experience to acquire the median of various pixels will be the following: we will determine the median of its red, green and blue components, and then create a new pixel using these medians. The following example illustrates the procedure.
Example:
Suppose we have to find the median of the three pixels with values 0xff223344, 0xff112233, 0xff001155.
- The median of the red component is 0x11 (since the red components are
0x22,0x11y0x00). - The median of the green component is 0x22 (since the green components are
0x33,0x22y0x11). - The median of the blue component is 0x44 (since the blue components are
0x44,0x33y0x55).
Therefore, the median of the pixels will be 0xff112244, composed of the medians of the red, green and blue components.
Notice that the result can be a pixel with a color that did not exist among the originals. Despite that, this detail does not affect the application we will be implementing in this laboratory experience.
!INCLUDE “../../eip-diagnostic/pesky-tourist/en/diag-pesky-tourist-02.html”
!INCLUDE “../../eip-diagnostic/pesky-tourist/en/diag-pesky-tourist-03.html”
Libraries
For this laboratory experiences you will need to know how to use the following methods for the vector C++ class:
push_back()// to insert an element at the end of the vectorat(i)// get element at position isize()// get the number of elements in the vectorclear()// empty the vector/remove the elements.
The following functions are useful to work with data of type QRgb:
qRed(pixel)// returns the tone of the red color of the pixelqGreen(pixel)// returns the tone of the green color of the pixelqBlue(pixel)// returns the tone of the blue color of the pixel
The objects of the QImage class have the following methods that will be useful to manipulate the pixels of an image:
width()// get the width of the imageheight()// get the height of the imagepixel(i, j)// gets the color of the pixel at position(i,j)setPixel(i, j, pixel)// sets the pixel at position(i,j) to the QRgb color pixel.qRgb(int red, int green, int blue)// returns aQRgbpixel composed of the values of red, green and blue received.
Examples:
QRgb myRgb = qRgb(0xff, 0x00, 0xff);: Assigns tomyRgbthe value0xff00ffthat represents the color
Notice that the value of
0xff00ffrepresents the values0xff,0x00,0xff, that correspond to the red, green and blue components ofmyRgb.If the following
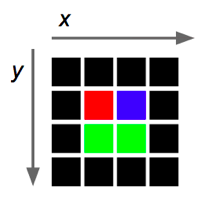
4 x 4image of pixels represents the objectoriginalImage,then
originalImage.pixel(2,1)returns thergbvalue that represents the color blue (0x0000ff).The following instruction assigns the red color to the pixel in position
(2, 3)in the edited image:editedImage.setPixel(2,3,qRgb(0xff,0x00,0x00));.The following instruction assigns a
greenContentthe value of the green value contained in the pixel(1, 1)of theoriginalImage:int greenContent = qGreen(originalImage.pixel(1,1));.The following code assigns to the red component of the pixel
(1, 1)ofeditedImagethe average of the values of the red tone that are in pixel(1, 1)oforiginalImage1andoriginalImage2and does the same to the green and blue components.
#include <QImage>

using namespace std;
int main() {
    int redEdit;
    int greenEdit;
    int blueEdit;
    QImage editedImage;

   redEdit=(qRed(originalImage1.pixel(1,1)) + qRed(originalImage2.pixel(1,1)))/2;
   greenEdit=(qGreen(originalImage1.pixel(1,1)) + qGreen(originalImage2.pixel(1,1)))/2;
   blueEdit=(qBlue(originalImage1.pixel(1,1)) + qBlue(originalImage2.pixel(1,1)))/2;

   editedImage.setPixel(1,1,qRgb(redEdit,greenEdit,blueEdit));

   return 0;
}
!INCLUDE “../../eip-diagnostic/pesky-tourist/en/diag-pesky-tourist-01.html”
Laboratory Session:
The project PeskyTourist contains the skeleton for the application to remove the noise from an image. In today’s laboratory experience yu will complete the application to process images using the median filter to remove the noise of an image, in this case a pesky tourist. You will be working in the Filter.cpp file.
General algorithm to remove noise from an image
Input: VI, a vector with N images
Output: an image without noise
---------------------------------------
For each position x, y:
     P is a vector of size N
    Assign to the elements of P the values of the pixels in position (x, y) of the N images in VI
    M = median of the pixels of P
 Assign the value of M to the pixel (x, y) of the image without noise.
Exercise 1: Implement the function to order a vector of integers
To find the median of the components of the colors in a pixel, we have to use a sorting function. In this part you will implement selection sort.
Instructions
Load the project
PeskyTouristintoQtCreator. There are two ways to do this:- Using the virtual machine: Double click the file
PeskyTourist.prolocated in the folder/home/eip/labs/sorting-peskytouristof your virtual machine. - Downloading the project’s folder from
Bitbucket: Use a terminal and write the commandgit clone http:/bitbucket.org/eip-uprrp/sorting-peskytouristto download the foldertema-nombrefromBitbucket. Double click the filePeskyTourist.prolocated in the folder that you downloaded to your computer.
- Using the virtual machine: Double click the file
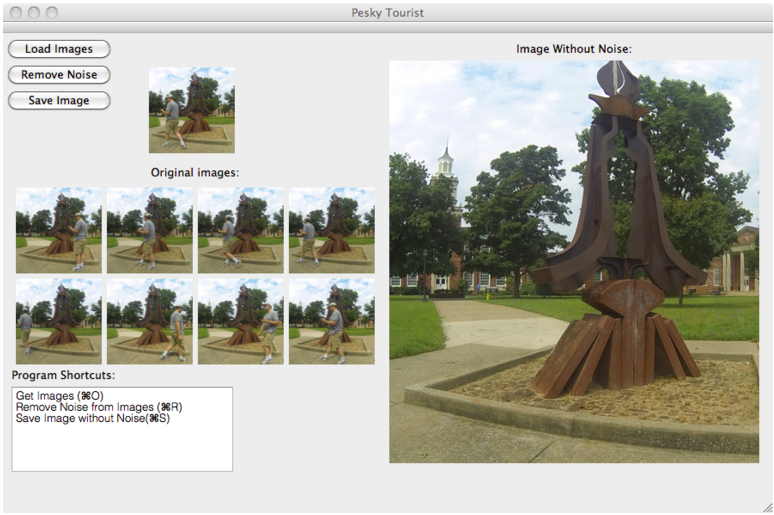
The code that we provide creates the interface in Figure 3.
Figura 3. Interface of the image editor.
Press the
Load Imagesbutton and look for the directoryImagesPeskyTouristthat contains the images of the pesky tourist.Your first task is to complete the
Sortfunction that receives a vector of integer. The function should order the integers of the vector in ascending order using the selection method.Create a unit test to validate the
Sortfunction and invoke it from theRemoveNoisefunction.
Exercise 2: Calculate the median of a vector of integers
Instructions
Complete the
Medianfunction that receives a vector of integers. TheMedianfunction should invoke theSortfunction to order the integers and calculate the median. The function returns the calculated median.Create a unit test to validate the
Medianfunction and invoke it from theRemoveNoisefunction.
Exercise 3: Calculate the median of each pixel
Complete the function MedianPixel that receives a vector of pixels (of type QRgb) and return the pixel QRgb corresponding to the median of the pixels. The median of the pixels is composed of the median of each color component of the pixels.
In the code we provide a function you can use to validate the MedianPixel function.
Algorithm:
To compute the median of pixels, for each of the color components (red, green and blue), extract the component in a vector and invoke the function Median to calculate the median of this vector. For example, if we receive a vector with the pixels 0xff112233, 0x113344, and 0x224455, one of the first tasks of the algorithm would be to extract the red components and create a vector with them: 0x11, 0x11 y 0x22. Afterwards this vector will be sent to the Median function to obtain the median (and we will obtain 0x11 as a result). This will be done also for the green and blue components.
Exercise 4: Remove noise
Your last task is to complete the RemoveNoise function that receives a vector of images with noise and the reference to the edited image that will have the noise removed.
Algorithm:
For each position $$(x,y)$$, create a vector of the pixels that will contain the values of the pixels in the position $$(x,y)$$ of each one of the images with noise. Invoke the MedianPixel function and assign the value of the median of the pixels in the position $$(x,y)$$ of the edited image.
When you complete the function, the Remove Noise button will execute your algorithms and display the final image.
Deliverables
Use “Deliverable” in Moodle to upload the Filter.cpp file that contains the functions you implemented in this laboratory experience. Remember to use good programming techniques, include the names of the programmers involved, and to document your program.
References
[1] John Nicholson, http://nifty.stanford.edu/2014/nicholson-the-pesky-tourist/


