
 Rafael Arce Nazario
cf43906dc4
Fixing markdown README.md. Removed most of the diagnostics
Rafael Arce Nazario
cf43906dc4
Fixing markdown README.md. Removed most of the diagnostics
|
10 年前 | |
|---|---|---|
| images | 10 年前 | |
| resources | 10 年前 | |
| README.md | 10 年前 | |
| StegaPanel.cpp | 10 年前 | |
| StegaPanel.h | 10 年前 | |
| StegaPanel.ui | 10 年前 | |
| Steganography.pro | 10 年前 | |
| images.qrc | 10 年前 | |
| main.cpp | 10 年前 | |
| mainwindow.cpp | 10 年前 | |
| mainwindow.h | 10 年前 | |
| mainwindow.ui | 10 年前 | |
| moc_StegaPanel.cpp | 10 年前 | |
| panel.cpp | 10 年前 | |
| panel.h | 10 年前 | |
| panel.ui | 10 年前 | |
| stega.pro | 10 年前 | |
| steganography.cpp | 10 年前 | |
| steganography.h | 10 年前 | |
| ui_StegaPanel.h | 10 年前 | |
| ui_panel.h | 10 年前 |
README.md
Estructuras de repetición - Esteganografía

Una de las ventajas de utilizar programas de computadoras es que podemos realizar tareas repetitivas fácilmente. Los ciclos como for, while, y do-while son estructuras de control que nos permiten repetir un conjunto de instrucciones. A estas estructuras también se les llama estructuras de repetición. En la experiencia de laboratorio de hoy completarás una aplicación de esteganografía para practicar el uso de ciclos anidados en la manipulación de arreglos bi-dimensionales.
Objetivos:
Aplicar ciclos anidados y estructuras de control para manipular arreglos bi-dimensionales y extraer mensajes escondidos en imágenes.
Utilizar programación modular.
Utilizar la representación binaria de caracteres.
Pre-Lab:
Antes de llegar al laboratorio debes haber:
Repasado los conceptos básicos relacionados a estructuras de repetición, arreglos bi-dimensionales y estructuras de control.
Estudiado los conceptos de componentes de color de los pixeles de imágenes.
Estudiado la representación binaria de caracteres.
Repasado los métodos de manipulación de “strings”.
Estudiado los conceptos e instrucciones de la sesión de laboratorio.
Tomado el quiz Pre-Lab que se encuentra en Moodle.
Esteganografía
La esteganografía es la ciencia de camuflar la presencia de mensajes ocultos en portadores legítimos (archivos que parecen inofensivos). Esta ciencia ha sido utilizada por delincuentes cibernéticos para ocasionar daños a sistemas de computadoras, y por terroristas para codificar mensajes ocultos en transmisiones de internet. Se dice que Al-Qaeda puede haber utilizado esteganografía para codificar mensajes en imágenes y luego transportarlos por correo electrónico, y posiblemente por USENET, para preparar y ejecutar los ataques terroristas del 11 de septiembre de 2001.
La esteganografía también tiene algunos usos legales [1]:
- Un laboratorio de imágenes médicas puede empotrar información del paciente en las imágenes y así prevenir fraude y/o errores en los diagnósticos del paciente.
- Podemos usar información oculta para identificar los dueños legítimos de un documento o imagen. Si el documento se filtra o se distribuye sin autorización, se puede trazar su origen hasta el dueño legítimo y quizás descubrir quién rompió el acuerdo de distribución.
En esta experiencia de laboratorio implementarás un algoritmo simple para extraer mensajes ocultos en imágenes usando técnicas de esteganografía.
Edición de imágenes
En esta experiencia de laboratorio, recuperarás un mensaje secreto que ha sido ocultado en una imagen. Para poder realizar tu tarea debes entender algunos conceptos relacionados a imágenes, conocer métodos de la clase QImage de Qt y funciones para trabajar con datos de tipo QRgb.
Píxeles
Al elemento más pequeño de una imagen se le llama un píxel. Esta unidad consiste de un solo color. Como cada color es una combinación de tonalidades de los colores primarios rojo, verde y azul, se codifica como un entero sin signo cuyos bytes representan los tonos de rojo, verde y azul del pixel (Figura 1). A esta combinación se le llama el RGB del color por las siglas de “Red-Green-Blue”. Por ejemplo, un píxel de color rojo (puro) tiene una representación RGB 0x00ff0000, mientras que un píxel de color blanco tiene una representación RGB de 0x00FFFFFF (ya que el color blanco es la combinación de los tonos rojo, verde y azul en toda su intensidad).
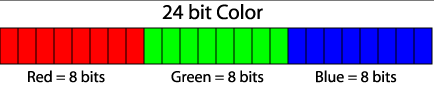
Figura 1. Distribución de bits para las tonalidades de rojo, verde y azul dentro de la representación RGB. Cada tonalidad puede tener valores entre 0x00 (los ocho bits en 0) y 0xFF (los 8 bits en 1).
En Qt se utiliza el tipo QRgb para representar valores RGB. Utilizando las funciones que describimos abajo podemos realizar algunas operaciones importantes de análisis de imágenes, tales como determinar el RGB de cada píxel de una imagen, y obtener los componentes rojo, verde y azul del valor QRgb del píxel.
Biblioteca
La experiencia de laboratorio de hoy utilizará la clase QImage. Esta clase permite acceder a los datos de los pixeles de una imagen para poder manipularla. La documentación de la clase QImage se encuentra en http://doc.qt.io/qt-4.8/qimage.html.
El código que te proveemos en el archivo steganography.cpp contiene los siguiente objetos de la clase QImage:
origImage// contiene la información de la imagen original donde se empotró el mensajenewImage// contendrá la imagen con el mensaje oculto
Los objetos de clase QImage tienen los siguiente métodos que serán útiles para la experiencia de laboratorio de hoy:
width()// devuelve el ancho de la imagen (un número entero positivo)height()// devuelve la altura de la imagen (un número entero positivo)pixel(i, j)// devuelve elQRgbdel píxel en la posición(i,j)
Las siguientes funciones te serán útiles para trabajar con datos de tipo QRgb:
qRed(pixel)// devuelve el tono del color rojo del píxel, i.e. un valor entre (0x00 y 0xFF)qGreen(pixel)// devuelve el tono del color verde del píxel, i.e. un valor entre (0x00 y 0xFF)qBlue(pixel)// devuelve el tono del color azul del píxel, i.e. un valor entre (0x00 y 0xFF)
Ejemplos:
Si la siguiente imagen
4 x 4de píxeles representa el objetoorigImage,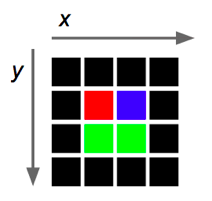
entonces origImage.pixel(2,1) devuelve un valor rgb que representa el color azul (0x0000ff).
- La siguiente instrucción le asigna a la variable
greenContentel valor del tono de verde que contiene el píxel(1,1)deorigImage:
int greenContent = qGreen(origImage.pixel(1,1));.
- El siguiente programa crea un objeto de clase
QImagee imprime los componentes rojo, verde y azul del pixel en el centro de la imagen. La imagen utilizada es la que se especifica dentro del paréntesis durante la creación del objeto, esto es, el archivochuck.png.
#include <QImage>
#include <iostream>

using namespace std;
int main() {
    QImage myImage(“/Users/rarce/Downloads/chuck.png”);
    QRgb    centralPixel;

    centralPixel = myImage.pixel(myImage.width() / 2, myImage.height() / 2);

    cout    << hex;

    cout    << “Los componentes rojo, verde y azul del pixel central son: “
        << qRed(centralPixel) << “, “
        << qGreen(centralPixel) << “, “
        << qBlue(centralPixel) << endl;
    return 0;
}
Empotrando un mensaje en una imagen
Uno de los métodos más simples para esconder un mensaje en una imagen es codificando el mensaje en los bits menos significativos de los componentes de los colores de los píxeles de la imagen. Este método esconde el mensaje en la imagen eficientemente porque el efecto al cambiar el bit menos significativo en un color de 8 bits es casi imperceptible para el ojo humano.
Por ejemplo, la Figura 2 muestra dos píxeles gigantes, el de la izquierda es de color 0xff0000y el de la derecha es de color 0xfe0101. Recuerda que el byte más significativo (esto es, los dos dígitos hexadecimales más a la izquierda) representan la intensidad del color rojo, el segundo byte representa la intensidad del color verde, y el byte menos significativo representa la intensidad del color azul. En la Figura 2, los bits menos significativos de los componentes rojo, verde y azul de los dos píxeles son diferentes, sin embargo, ambos píxeles se ven del mismo color. El píxel de la derecha es el resultado de codificar el mensaje de tres bits 011 en los bits menos significativos de cada color en el píxel original. Esto es, codificar el 0 en el bit menos significativo del componente rojo, codificar el 1 en el bit menos significativo del componente verde, y codificar el 1 en el bit menos significativo del componente azul del píxel.

Figura 2. El cuadrado de la izquierda representa un píxel de color 0xff0000. El cuadrado de la derecha representa un píxel de color 0xfe0101.
Ahora ilustraremos el procedimiento para empotrar la palabra en inglés “Dog” en la siguiente imagen:
Asume que cada cuadrado es un píxel de la imagen.
El primer paso sería obtener la representación ASCII del mensaje. Los bits de la representación ASCII son los bits que codificaremos en los colores de los píxeles. La representación ASCII de “Dog” es:
"Dog" = 01000100 01101111 01100111
El código 01000100 corresponde a la D, y así sucesivamente.
El proceso de codificación es más fácil de entender si separamos los bits en grupos de tres (un bit por cada componente del RGB):
"Dog" = 010 001 000 110 111 101 100 111
Ahora, comenzamos a recorrer la imagen píxel por píxel, empotrando en cada píxel tres bits del código ASCII (un bit en cada componente de color del píxel). Por ejemplo, empotraríamos 010 en el primer píxel, 001 en el segundo, y así sucesivamente.
Podemos hacer lo siguiente para empotrar cada trío de bits b2, b1, b0:
Datos de entrada: p: un píxel
    b2,b1,b0: el trío de bits
Dato de salida: modifiedPixel: el píxel con el trío empotrado
========
1. r = componente rojo de p
2. g = componente verde de p
3. b = componente azul de p
4. "limpiar" o apagar" los bits menos significativos de r,g,b
5. el componente rojo de modifiedPixel contendrá b2 sustituido en el bit menos significativo de r
6. el componente verde de modifiedPixel contendrá b1 sustituido en el bit menos significativo de g
7. el componente azul de modifiedPixel contendrá b0 sustituido en el bit menos significativo de b
Por ejemplo, digamos que queremos empotrar el trío 011 en el píxel cuyo código de color es 0xa5b6c7. El algoritmo computará como sigue:
1. r = 0x10100101  // esto es 0xa5
2. g = 0x10110110  // esto es 0xb6
3. b = 0x11000111  // esto es 0xc7
4. "limpiar" los bits menos significativos de r,g,b
   r será 0x10100100
   g será 0x10110110
   b será 0x11000110
5. el componente rojo de modifiedPixel será 0x10100100 (esto es, 0xa4)
6. el componente verde de modifiedPixel será 0x10110111 (esto es 0xb7)
7. el componente azul de modifiedPixel será 0x11000111 (esto es 0xc7)

el código del color de modifiedPixel será 0xa4b7c7
La siguiente es la imagen después que la palabra “Dog” fue empotrada.

Solo el color de los primeros 8 píxeles fue modificado, ya que el código ASCII para todas las letras en la palabra “Dog” tiene 24 bits de largo.
Los siguientes son los códigos de los colores de los primeros ocho píxeles de la imagen original y de la imagen modificada.
| Píxel de la imagen original | Trío de bits | Píxel de la imagen modificada |
|---|---|---|
0x99 99 99 |
010 |
0x98 99 98 |
0x00 00 00 |
001 |
0x00 00 01 |
0x00 00 00 |
000 |
0x00 00 00 |
0x00 00 00 |
110 |
0x01 01 00 |
0x00 00 00 |
111 |
0x01 01 01 |
0x00 00 00 |
101 |
0x01 00 01 |
0x00 00 00 |
100 |
0x01 00 00 |
0x00 00 00 |
111 |
0x01 01 01 |
Pregunta: ¿Qué mensaje está escondido (usando la técnica del bit menos significativo) en una imagen cuyos primeros 8 píxeles son:
0x545554 0x666667 0x444544 0x333232
0xff0000 0x0100ff 0x00ff00 0x10aaba
Explica tu respuesta.
!INCLUDE “../../eip-diagnostic/steganography/es/diag-steganography-05.html”
Sesión de laboratorio:
En la experiencia de laboratorio de hoy completarás una aplicación de esteganografía para extraer mensajes ocultos en imágenes.
Ejercicio 1: Extraer el mensaje binario
Instrucciones
Carga a QtCreator el proyecto
Steganographyhaciendo doble “click” en el archivoSteganography.proen el directorioDocuments/eip/Repetitions-Steganographyde tu computadora. También puedes ir ahttp://bitbucket.org/eip-uprrp/repetitions-steganographypara descargar la carpetaRepetitions-Steganographya tu computadora.El proyecto contiene el esqueleto de una aplicación para recuperar mensajes empotrados en imágenes. Los mensajes que estarás recobrando se empotraron utilizando la técnica del bit menos significativo. El final de cada mensaje se codificó utilizando el caracter ASCII con código binario
00000000.Compila y corre el programa. Debes obtener una interface que luce parecida a:
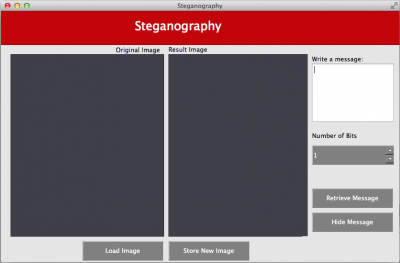
El botón
Load Imagefue programado para permitir al usuario cargar una imagen y desplegarla. Tu tarea es programar la funcionalidad del botónRetrieve Messagepara analizar la imagen y extraer el mensaje escondido. El mensaje escondido debe desplegarse en la ventana que diceWrite a message.Estarás trabajando con el archivo
steganography.cpp. Completa la funciónExtractMessageque recibe una imagen de esteganografía para que extraiga los dígitos del mensaje binario empotrado en la imagen y los guarde en un “string”. La función debe invocar otra funciónbinaryStringToMessageque convierta el “string” de0’s y1’s en los caracteres del mensaje y devolver el mensaje oculto.Por ejemplo, si los primeros píxeles de la imagen fuesen los siguientes,
0x98 99 98 0x00 00 01 0x00 00 00 0x01 01 00
0x01 01 01 0x01 00 01 0x01 00 00 0x01 01 01
0xf0 ea 00 0x44 00 f0 0x00 aa 22 . . . .,
tu función
ExtractMessageextraería los bits menos significativos de cada componente de color construiría el siguientestring:”010001000110111101100111000000000…”.Nota que tu algoritmo debe tener algún mecanismo para detectar si el último bloque de 8 caracteres extraídos eran todos
0. Cuando esto pase, el algoritmo debe parar de leer los píxeles.El “string” de dígitos binarios debe ser enviado a otra función
binaryStringToMessage(ver Ejercicio 2) que interprete los0’s y1’s como los bits de caracteres ASCII. En el ejemplo, si pasaras el argumento”010001000110111101100111000000000”a la funciónbinaryStringToMessage, debería devolver “Dog” (porque01000100corresponde aD,01101111es ‘o’,01100111es ‘g’, y un00000000simboliza que se terminó el “string”.)
Para poder implementar el algoritmo de extracción del mensaje, debes entender cómo fue empotrado el mensaje. Si es necesario, repasa la sección “Empotrando un mensaje en una imagen”.
Ejercicio 2: Interpretar el mensaje
Instrucciones
Completa la función
binaryStringToMessageque recibe el “string” de0’s y1’s extraido de la imagen para que devuelva el mensaje oculto. Puedes aprovechar la funciónbinStringToCharpara convertir “substrings” de 80’s y1’s en el caracter que le corresponde.Prueba tu código usando las siguientes imágenes
pug.png, contiene el mensaje “Hello World !”uprTorre.png, contiene el mensaje “CCOM3033 - Steganography Lab Rules!!!”
Una vez que valides tu código con las imágenes de prueba, usa el programa para analizar las siguientes imágenes:
gallito.pngpuppy.pngvacas.png
Entrega
Utiliza “Entrega” en Moodle para entregar el archivo steganography.cpp que contiene las funciones ExtractMessage y binaryStringToMessage. Recuerda utilizar buenas prácticas de programación, incluir el nombre de los programadores y documentar tu programa.
Referencias
[1] Rocha, Anderson, and Siome Goldenstein. “Steganography and steganalysis in digital multimedia: Hype or hallelujah?.” Revista de Informática Teórica e Aplicada 15.1 (2008): 83-110.
Repetition Structures - Steganography
One of the advantages of using computer programs is that we can easily implement repetitive tasks. Structures such as the for, while, and do-while allow us to repeat a block of instructions as many times as needed. These structures are also referred to as repetition structures. In today’s laboratory experience you will complete a steganography application to practice the use of nested loops and the manipulation of bidimensional arrays.
Objectives:
Apply nested loops and decision structures to manipulate bidimensional arrays and extract messages hidden in images.
Use modular programming.
Use the binary representation of characters.
Pre-Lab:
Before coming to the laboratory session you should have:
Reviewed the basic concepts related to repetition structures, bidimensional arrays and decision structures.
Studied the concepts of the color composition of pixels in images.
Studied the binary representation of characters.
Reviewed the string manipulation methods.
Studied the concepts and instructions related to the laboratory session.
Taken the Pre-Lab quiz available through the course’s Moodle portal.
Steganography
Steganography is the science of camouflaging the presence of hidden messages in legitimate carriers (seemingly harmless files). This science has been used by cybercriminals to inflict damage to computer systems and by (old style) terrorists to encode hidden messages transmitted through the internet. There is claim that Al-Qaeda may have used steganography to encode messages into images, and then transport them via e-mail, and possibly via USENET, to prepare and execute the September 11, 2001 terrorist attack.
Steganography has some lawful uses too [1]:
- A medical imaging laboratory can embed a patient’s information into the images, thus preventing against fraud and/or patient misdiagnosis.
- We can use hidden information to identify the legitimate owner of a document or image. If the document is leaked, or distributed to unauthorized parties, one can trace it back to the rightful owner and perhaps discover which party broke the license distribution agreement.
In this laboratory experience you will implement a simple algorithm to extract hidden messages from steganography images.
Image Editing
In this laboratory experience, you will recover secret messages that have been hidden in an image. To be able to carry out your task, you should understand some concepts related to images, be familiar with the methods of the QImage class in Qt, and with functions to work with data of the QRgb type.
Pixels
The smallest element in an image is called a pixel. This unit consists of a single color. Since each color is a combination of tones for the primary red, green and blue colors, it is coded as an unsigned integer whose bytes represent the tones of red, green and blue of the pixel (Figure 1). This combination is called the color’s RGB which is an acronym for “Red-Green-Blue”. For example, a pure red pixel has an RGB representation of 0x00ff0000, while a white pixel has an RGB representation of 0x00FFFFFF (since the color white is a combination of tones of red, green and blue in all of their intensity).
Figure 1. Bit distribution for the tones of red, green and blue in an RGB representation. Each tone can have values between 0x00 (the eight bits in 0) and 0xFF (the 8 bits in 1).
Qt uses the QRgb type to represent RGB values. Using the functions that are described below we can perform important operations to analyze images, such as obtaining the RGB of each pixel in an image, and to obtain the red, green and blue components of the QRgb value of the pixel.
Library
In today’s laboratory experience you will use the QImage class. This class allows you to access the data in the pixels of an image to manipulate it. The documentation for the QImage class can be found in http://doc.qt.io/qt-4.8/qimage.html.
The code provided in the file steganography.cpp contains the following objects of the QImage class:
origImage// contains the information of the original image where the message was hiddennewImage// will contain the image with the hidden message
The objects of the QImage class have the following methods that will be useful for today’s laboratory experience:
width()// returns the positive integer value for the image’s widthheight()// returns the positive integer value for the image’s heightpixel(i, j)// returns theQRgbfor the pixel in position(i,j)
The following functions are useful to work with data of type QRgb:
qRed(pixel)// returns the tone for the pixel’s red color, i.e. a value between (0x00 and 0xFF)qGreen(pixel)// returns the tone for the pixel’s green color, i.e. a value between (0x00 and 0xFF)qBlue(pixel)// returns the tone for the pixel’s blue color, i.e. a value between (0x00 and 0xFF)
Examples:
If the following
4 x 4image of pixels represents the objectorigImage,
then origImage.pixel(2,1) returns the rgb value that represents the color blue ( 0x0000ff).
The following instruction assigns to
greenContentthe value of the green tone that is contained in the pixel(1,1)oforigImage:int greenContent = qGreen(origImage.pixel(1,1));.The following program creates an object of class
QImageand prints the red, green and blue components of the pixel in the center of the image. The image used is the one specified within the parenthesis during the creation of the object, that is, the filechuck.png.
#include <QImage>
#include <iostream>

using namespace std;
int main() {
    QImage myImage(“/Users/rarce/Downloads/chuck.png”);
    QRgb    centralPixel;

    centralPixel = myImage.pixel(myImage.width() / 2, myImage.height() / 2);

    cout    << hex;

    cout    << “The red, green and blue components of the middle pixel are: “
        << qRed(centralPixel) << “, “
        << qGreen(centralPixel) << “, “
        << qBlue(centralPixel) << endl;
    return 0;
}
Embedding a message into an image
One of the simplest methods of hidding a message in an image is by encoding the message into the least significant bits of the image pixel’s colors. This method effectively hides the message in the image because changing the least significant bit of a 8-bit color is barely noticeable by the human observer.
For example, Figure 2 shows two huge pixels, the one on the left has color 0xff0000 and the one on the right has color 0xfe0101. Recall that the most significant byte (i.e. the two leftmost hex digits) represents the intensity of the red color, the second byte represents the intensity of the green color, and the least significant byte represents the intensity of the blue color. In Figure 2, the least significant bits of the red, green and blue components of the two pixels are different, yet, they look the same color. The pixel on the right is the result of encoding the three bit message 011 into the original pixel’s least significant bits (of each color). That is, encode the 0 in the least significant bit of the red component, encode the 1 in the least significant bit of the green component, and encode the 1 in the least significant bit of the blue component in the pixel.
Figure 2. The left square represents a pixel of color 0xff0000. The right square represents a pixel of color 0xfe0101.
Let’s illustrate the embedding procedure of the word “Dog” into the following image:
Assume that each square is a pixel of the image.
The first step would be to obtain the ASCII representation of the message. The bits of the ASCII representation are the bits we will encode into the colors of the pixels. The ASCII representation of Dog is:
"Dog" = 01000100 01101111 01100111
The code 0100 0100 corresponds to the D, and so forth.
The encoding procedure it is easier to understand if we separate the bits into groups of three (one bit for each RGB component):
"Dog" = 010 001 000 110 111 101 100 111
Next, we start traversing the image pixel by pixel, embedding in each pixel three bits from the ASCII code (one bit in each pixel’s color component). For instance, we would embed 010 in the first pixel, 001 in the second, and so forth.
We may do the following to embed each trio of bits b2, b1, b0:
Input: p: a pixel
b2,b1,b0: the trio of bits
Output: modifiedPixel: the pixel with the embedded trio
========
1. r = red component of p
2. g = green component of p
3. b = blue component of p
4. clear the least significant bits of r,g,b
5. the red component of modifiedPixel will contain b2 substituted in the least significant bit of r
6. the green component of modifiedPixel will contain b1 substituted in the least significant bit of g
7. the blue component of modifiedPixel will contain b0 substituted in the least significant bit of b
For example, say that you are embedding the bit trio 011 into a pixel whose color code is 0xa5b6c7. The algorithm would compute as follows:
1. r = 0x10100101  // this is 0xa5
2. g = 0x10110110  // this is 0xb6
3. b = 0x11000111  // this is 0xc7
4. clear the least significant bits of r,g,b
   r becomes 0x10100100
   g becomes 0x10110110
   b becomes 0x11000110
5. the red component of the modifiedPixel will be 0x10100100 (that is, 0xa4)
6. the green component of the modifiedPixel will be 0x10110111 (that is 0xb7)
7. the blue component of the modifiedPixel will be 0x11000111 (that is 0xc7)

the modifiedPixel color code will be 0xa4b7c7
The following is the image after the word “Dog” was embedded.
Only the color of the first 8 pixels was modified, since the combined ASCII code for “Dog” was 24 bits long.
The following are the color codes for first eight pixels of the original and modified images:
| Original Image pixel | Bit trio | Modified image pixel |
|---|---|---|
0x99 99 99 |
010 |
0x98 99 98 |
0x00 00 00 |
001 |
0x00 00 01 |
0x00 00 00 |
000 |
0x00 00 00 |
0x00 00 00 |
110 |
0x01 01 00 |
0x00 00 00 |
111 |
0x01 01 01 |
0x00 00 00 |
101 |
0x01 00 01 |
0x00 00 00 |
100 |
0x01 00 00 |
0x00 00 00 |
111 |
0x01 01 01 |
Question: What message is hidden (using the least significant bit technique) in an image whose first 8 pixels are:
0x545554 0x666667 0x444544 0x333232
0xff0000 0x0100ff 0x00ff00 0x10aaba
Explain your answer.
!INCLUDE “../../eip-diagnostic/steganography/en/diag-steganography-05.html”
Laboratory Session
In today’s laboratory experience you will complete a steganography application to extract hidden messages from images.
Exercise 1: Extract the binary message
Instructions
- Load the Qt project called
Steganographyby double-clicking on theSteganography.profile in theDocuments/eip/Repetitions-Steganographyfolder of your computer. You can also go tohttp://bitbucket.org/eip-uprrp/repetitions-steganographyto download theRepetitions-Steganographyfolder to your computer.
The project contains the skeleton for an application to recover embedded messages from images. The messages that you will be recovering have been embedded using the least significant bit technique. The end of each message was encoded by using the ASCII character with binary code 00000000.
Compile and run the program. You should obtain an interface that looks similar to:
The button
Load Imagehas already been programmed to allow the user to load an image and display it. Your task is to program the functionality of the buttonRetrieve Messageto analyze the image and extract the hidden message. The hidden message should be displayed in theWrite a messagewindow.You will be working with the
steganography.cppfile. Complete theExtractMessagefunction that receives a steganography image so it extracts the digits of the binary message encoded in the image and stores them in a string. The function should invoke another functionbinaryStringToMessagethat converts the string from0’s and1’s in the message’s characters and returns the hidden message.For example, if the first few pixels the image were these:
  0x98 99 98 0x00 00 01 0x00 00 00 0x01 01 00
  0x01 01 01 0x01 00 01 0x01 00 00 0x01 01 01
  0xf0 ea 00 0x44 00 f0 0x00 aa 22 . . . .
your ExtractMessage function would extract the least significant bits of each colors component and construct the string: "010001000110111101100111000000000..".
Notice that your algorithm should have some mechanism for detecting if the last 8 character block were all 0. When this happens, the algorithm should stop reading the pixels.
The string of binary digits should then be sent to another function binaryStringToMessage (see Exercise 2) that interprets the 0’s and 1’s as the bits of ASCII characters. In the example, the string ”010001000110111101100111000000000” would be decoded to “Dog”
(because 01000100 corresponds to ’D’, 01101111 is ‘o’, 01100111 is ‘g’, and a 00000000 symbolizes the end of the string.)
To implement the algorithm for extracting the message, you should understand how the message was encoded. If necessary, review the “Embedding a message into an image” section.
Exercise 2: Interpreting the message
Instructions
Complete the
binaryStringToMessagefunction that receives the string of0’s and1’s extracted from the image so it returns the hidden message. You can use thebinStringToCharfunction to convert substrings of 80’s and1’s in its corresponding character.Test your code using the following images:
pug.png, contains the message “Hello World !”uprTorre.png, contains the message “CCOM3033 - Steganography Lab Rules!!!”
Once you validate your program using the test images, use the program to analyze the following images.
gallito.pngpuppy.pngvacas.png
Deliverables
Use “Deliverables” in Moodle to upload the steganography.cpp file that contains the ExtractMessage and binaryStringToMessage functions. Remember to use good programming techniques, include the names of the programmers involved, and to document your program.
References
[1] Rocha, Anderson, and Siome Goldenstein. “Steganography and steganalysis in digital multimedia: Hype or hallelujah?.” Revista de Informática Teórica e Aplicada 15.1 (2008): 83-110.