
 Jose Ortiz
6d49419ccd
initial commit
Jose Ortiz
6d49419ccd
initial commit
|
10 years ago | |
|---|---|---|
| doc | 10 years ago | |
| images | 10 years ago | |
| README.md | 10 years ago | |
| Tessellations.pro | 10 years ago | |
| drawingWindow.cpp | 10 years ago | |
| drawingWindow.h | 10 years ago | |
| drawingWindow.ui | 10 years ago | |
| line.cpp | 10 years ago | |
| line.h | 10 years ago | |
| main.cpp | 10 years ago | |
| tessellation.cpp | 10 years ago | |
| tessellation.h | 10 years ago |
README.md
Estructuras de repetición - Mosaicos
Una de las ventajas de utilizar programas de computadoras es que podemos realizar tareas repetitivas fácilmente. Los ciclos como for, while, y do-while son estructuras de control que nos permiten repetir un conjunto de instrucciones. A estas estructuras también se les llama estructuras de repetición. En la experiencia de laboratorio de hoy practicarás el uso de ciclos anidados para producir patrones y mosaicos.
Objetivos:
Practicar el uso de estructuras de repetición al construir patrones y mosaicos.
Reforzar las destrezas de uso de funciones y objetos.
Esta experiencia de laboratorio es una adaptación de https://sites.google.com/a/wellesley.edu/wellesley-cs118-spring13/lectures-labs/lab-2.
Pre-Lab:
Antes de llegar al laboratorio debes haber:
Repasado los conceptos básicos relacionados a estructuras de repetición.
Estudiado los conceptos e instrucciones para la sesión de laboratorio, especialmente el uso de los métodos para:
a. ajustar el tamaño de las ventanas,
b. colocar las teselaciones en posiciones específicas,
c. rotar teselaciones.
Tomado el quiz Pre-Lab que se encuentra en Moodle.
Teselaciones
Una teselación (“tessellation” o “tilling”) es un mosaico que se crea repitiendo una figura para cubrir una superficie sin dejar huecos y sin solapamientos. Una teselación regular es una figura que se forma repitiendo un mismo polígono regular, como triángulos, cuadrados o hexágonos. (Un polígono regular es un polígono cuyos lados son congruentes y en el que los ángulos que forman los lados son congruentes.)
Figura 1 - Las únicas teselaciones regulares posibles obtenidas usando triángulos, cuadrados o hexágonos.
Biblioteca
El proyecto Tessellations.pro disponible en http://bitbucket.org/eip-uprrp/repetitions1-tessellations contiene la clase Tessellation, que es una abstracción de una teselación con cuadrados, y la clase DrawingWindow. El código de muestra en la Figura 2 crea un DrawingWindow llamado w, un Tessellation llamado t y coloca la teselación en la posición (50,100). Nota que el método addTessellation de la clase DrawingWindow debe ser invocado para que la teselación se dibuje.
int main(int argc, char *argv[]) {
    QApplication a(argc, argv);

    DrawingWindow w;        // crea el objeto w de la clase DrawingWindow
    w.resize(300, 300);
    w.show();

    Tessellation t;          // crea el objeto t de la clase Tessellation
    t.move(50,100);         // dice la posición de la teselacion

    w.addTessellation(t);    // añade la teselacion a la ventana

    return a.exec();
}
Figura 2. Código en función main para crear ventana y teselación.
La ventana que se obtiene con el código de la Figura 2 es similar a la ventana en la Figura 3. Las flechas y los números 50 y 100 ilustran los espacios entre la esquina superior izquierda de la teselación y los bordes de la ventana. La esquina superior izquierda de la teselación está en la posición (50,100).
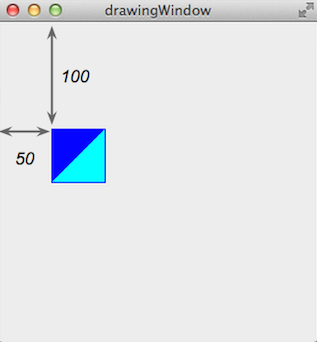
Figura 3. Ventana con teselación en la posición (50,100).
Ejemplo 1. El código de la Figura 4 contiene una función foo para dibujar cuatro teselaciones en las posiciones (0,0), (50,50), (100,100), and (150,150), con rotaciones de la figura original de $$0^\circ, 90^\circ, 180^\circ y 270^\circ$$ (a favor de las manecillas del reloj).
int foo(DrawingWindow &w) {
    int rot = 0;
    for (int i = 0; i < 4; i++) {
        Tessellation t;
        t.setRotation(rot);
        t.move(i * 50, i * 50);
        w.addTessellation(t);
        rot += 90;
    }

}

int main(int argc, char *argv[]) {
    QApplication a(argc, argv);

    DrawingWindow w;
    w.resize(300, 300);
    w.show();

    foo(w);
    return a.exec();
}
Figura 4. Código de la función foo que dibuja cuatro teselaciones.
Observa como la función foo necesita recibir una referencia al objeto w de la clase DrawingWindow ya que está invocando el método addTessellation de esta clase en cada iteración del ciclo. La figura que se obtiene es similar a la de la Figura 5.
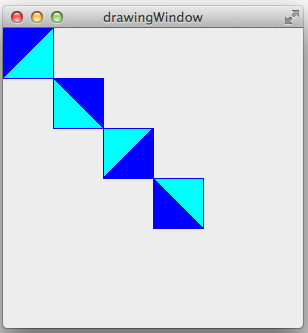
Figura 5. Teselaciones dibujadas por la función foo en el código de la Figura 4.
Ejemplo 2. El código de la Figura 6 nos muestra un ejemplo del uso de ciclos anidados para crear teselaciones.
int fah(DrawingWindow &w) {
    int rot = 0;
    for (int i = 0; i < 4; i++) {
     for (int j = 0; j < 4; j++) {
Tessellation t;
                t.move(i * 50, j * 50);
t.setRotation(rot);
            w.addTessellation(t);
    }
            rot += 90;
    }

}
Figura 6. Código de la función fah que utiliza ciclos anidados para dibujar cuatro teselaciones.
La figura que se obtiene es similar a la de la Figura 7.
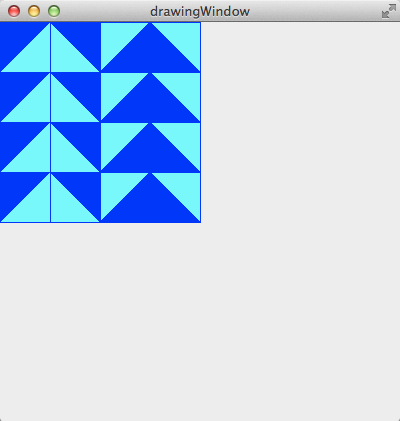
Figura 7. Teselaciones dibujadas por la función fah en el código de la Figura 6.
Sesión de laboratorio:
En la experiencia de laboratorio de hoy practicarás el uso de ciclos anidados para crear distintas teselaciones.
Ejercicio 1: Estudiar ciclo que produce teselaciones
Instrucciones
Carga a Qt el proyecto
Tessellationshaciendo doble “click” en el archivoTessellations.proen el directorioDocuments/eip/Repetitions-Tessellationsde tu computadora. También puedes ir ahttp://bitbucket.org/eip-uprrp/repetitions-tessellationspara descargar la carpetaRepetitions-Tessellationsa tu computadora.El proyecto
Tessellations.procontiene las clasesTessellationyDrawingWindowy la funciónfoo. Configura el proyecto y corre el programa. Debes observar una pantalla parecida a la Figura 5.Esta figura se crea con la función
foomostrada en la Figura 4 y explicada en el Ejemplo 1. La funciónfooes invocada desdemain(). En esta experiencia de laboratorio solo estarás haciendo cambios a la funciónmain().Estudia nuevamente la función
fooy nota la creación de los objetos de la claseTessellations, el uso del métodosetRotationy el métodomovepara colocar la teselación en la posición deseada. Nota cómo las instrucciones en el cicloforde la función utilizan el contador del ciclo para determinar la posición del cuadrado y como se incrementa el valor de la rotación. También nota que necesitas utilizar el métodoaddTessellationpara que la teselación se añada en la ventanaw.
Ejercicio 2: Crear función y teselación herringbone
Instrucciones
Crea una función
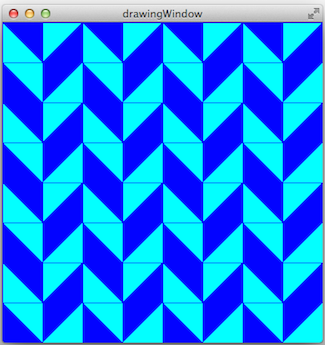
herringboneque produzca la teselación de la Figura 8. El tamaño de la ventana es 400x400. El tamaño de cada cuadrado de la teselación es su tamaño por defecto: 50x50.

Figura 8. Teselación que debe dibujar la función
herringbone.Comenta la invocación de la función
foo.Invoca la función
herringbonedesdemain()y corre tu programa para que veas la teselación que creaste.
Ejercicio 3: Crear función y teselación zigzag
Instrucciones
Crea una función
zigzagque produzca la teselación de la Figura 9.
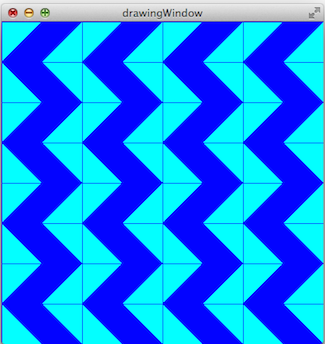
Figura 9. Teselación que debe dibujar la función
zigzag.Comenta la invocación de la función
herringbone.Invoca la función
zigzagdesdemain()y corre tu programa para que veas la teselación que creaste.
Ejercicio 4: Crear función y teselación diamond
Instrucciones
Crea una función
diamondque produzca la teselación de la Figura 10.
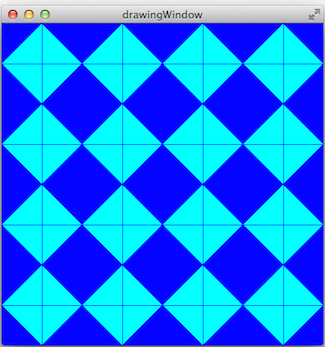
Figura 10. Teselación que debe dibujar la función
diamond.Comenta la invocación de la función
zigzag.Invoca la función
diamonddesdemain()y corre tu programa para que veas la teselación que creaste.
Entrega
Utiliza “Entrega” en Moodle para entregar el archivo main.cpp que contiene las funciones herringbone, zigzag y diamond que creaste en los Ejercicios 2, 3 y 4 y sus invocaciones. Recuerda utilizar buenas prácticas de programación, incluir el nombre de los programadores y documentar tu programa.
Referencias
[1] https://sites.google.com/a/wellesley.edu/wellesley-cs118-spring13/lectures-labs/lab-2.
Repetition Structures - Tessellations
One of the advantages of using computer programs is that we can easily implement repetitive tasks. Structures such as the for, while, and do-while allow us to repeat a block of instructions as many times as needed. In this lab experience you will use for loops produce patterns and mosaics.
Objectives:
Practice the use of repetition structures to make patterns and tessellations.
Strengthen the use of functions and objects.
This laboratory experience is an adaptation of https://sites.google.com/a/wellesley.edu/wellesley-cs118-spring13/lectures-labs/lab-2.
Pre-Lab:
Before coming to the laboratory session you should have:
Reviewed the basic concepts related to repetition structures.
Studied the concepts and instructions for the laboratory session, especially the use of the methods for:
a. adjusting the size of the windows,
b. adjusting the position of the tessellations,
c. rotate tessellations.
Taken the Pre-Lab quiz available through the course’s Moodle portal.
Tessellations
A tessellation is a mosaic that is created by repeating a figure to cover the surface without leaving empty spaces or overlapping the figures. A regular tessellation is a figure that is made by repeating the same regular polygon, like triangles, squares or hexagons. (A regular polygon is a polygon where all sides are congruent and the angles that form the sides are congruent.)
Figure 1 - The only regular tessellations possible obtained using triangles, squares and hexagons.
Library
The Tessellations.pro project available in http://bitbucket.org/eip-uprrp/repetitions1-tessellations contains the Tessellation class, which is an abstraction of a tessellation with squares, and the DrawingWindow class. The code shown in Figure 2 creates a DrawingWindow called w, a Tesselation called t and places the tessellation in position (50,100). Notice that the addTessellation method of the DrawingWindow class should be invoked to draw the tessellation.
int main(int argc, char *argv[]) {
    QApplication a(argc, argv);

    DrawingWindow w;        // Creates the w object of the DrawingWindow class    w.resize(300, 300);
    w.show();

    Tessellation t;          // Creates the t object of the Tessellation class
    t.move(50,100);         // Sets the tessellation's position

    w.addTessellation(t);    // Adds the tessellation to the window

    return a.exec();
}
Figure 2. Code in the main function to create a window and tessellation.
The window that is obtained with the code in Figure 2 is similar to the window in Figure 3. The arrows and the numbers 50 and 100 illustrate the spaces between the tessellation’s upper left corner and the window’s borders. The tessellation’s upper left corner is in the position (50,100).
Figure 3. Window with the tessellation in the position (50,100).
Example 1. The code in Figure 4 contains a foo function to draw four tessellations in the positions (0,0), (50,50), (100,100), and (150,150), with the original figure’s rotation of $$0^\circ, 90^\circ, 180^\circ y 270^\circ$$ (clockwise).
int foo(DrawingWindow &w) {
    int rot = 0;
    for (int i = 0; i < 4; i++) {
        Tessellation t;
        t.setRotation(rot);
        t.move(i * 50, i * 50);
        w.addTessellation(t);
        rot += 90;
    }

}

int main(int argc, char *argv[]) {
    QApplication a(argc, argv);

    DrawingWindow w;
    w.resize(300, 300);
    w.show();

    foo(w);
    return a.exec();
}
Figure 4. Code for the foo function that draws four tessellations.
Observe how the foo function needs to receive a reference to the w object of the DrawingWindow class since its invoking the addTessellation method of the class in each iteration of the loop. The figure that is obtained is similar to the one in Figure 5.
Figure 5. Tessellations drawn by the foo function in the code in Figure 4.
Example 2. The code in Figure 6 shows an example of how to use nested loops to create tessellations.
int fah(DrawingWindow &w) {
    int rot = 0;
    for (int i = 0; i < 4; i++) {
     for (int j = 0; j < 4; j++) {
Tessellation t;
                t.move(i * 50, j * 50);
t.setRotation(rot);
            w.addTessellation(t);
    }
            rot += 90;
    }

}
Figure 6. Code for the fah function that uses nested loops to draw four tessellations.
The figure that is obtained is similar to the one in Figure 7.
Figure 7. Tessellations drawn by the fah function in the code in Figure 6.
Laboratory Session
In today’s laboratory experience you will practice the use of nested loops to create different tessellations.
Exercise 1: Study the loop that produces tessellations
Instructions
Load the Qt project called
Tessellationsby double-clicking on theTessellations.profile in theDocuments/eip/Repetitions-Tessellationsfolder of your computer. Alternatively, you may clone the git repositoryhttp://bitbucket.org/eip-uprrp/repetitions-tessellationsto download theRepetitions-Tessellationsfolder to your computer.The
Tessellations.proproject contains theTessellationsandDrawingWindowclasses and thefoofunction. Configure the project and run the program. You should see a window similar to the one in Figure 5.
This figure is created with the foo function shown in Figure 4 and explained in Example 1. The foo function is invoked from main(). In this laboratory experience you will only be making changes to the main() function.
Study the foo function once again and notice the creation of the objects from the Tessellations class, the use of the setRotation method, and the move method to set the tessellation in the desired position. Notice how the instructions in the for loop in the function use the loop’s counter to determine the square’s position and how the rotation’s value is incremented. Also notice that you will need to use the addTessellation method to add the tessellation to the w window.
Exercise 2: Create the herringbone function and tessellation
Instructions
Create a
herringbonefunction that produces the tessellation in Figure 8. The size of the window is 400x400. The size of each square in the tessellation is its size by default: 50x50.
Figure 8. Tessellation that the
herringbonefunction should draw.Comment the invocation of the
foofunction.Invoke the
herringbonefunction frommain()and run the program so you can see the tessellation you created.
Exercise 3: Create the zigzag function and tessellation
Instructions
Create a
zigzagfunction that produces the tessellation in Figure 9.
Figure 9. Tessellation that the
zigzagfunction should draw.Comment the invocation of the
herringbonefunction.Invoke the
zigzagfunction frommain()and run the program so you can see the tessellation you created.
Exercise 4: Create the diamond function and tessellation
Instructions
Create a
diamondfunction that produces the tessellation in Figure 10.
Figure 10. Tessellation that the
diamondfunction should draw.Comment the invocation of the
zigzagfunction.Invoke the
diamondfunction frommain()and run the program so you can see the tessellation you created.
Deliverables
Use “Deliverables” in Moodle to upload the main.cpp file that contains the herringbone, zigzag and diamond functions that you created in Exercises 2, 3, and 4. Remember to use good programming techniques, include the names of the programmers involved, and to document your program.
References
[1] https://sites.google.com/a/wellesley.edu/wellesley-cs118-spring13/lectures-labs/lab-2.